I gave a part of a talk at Copia on Sunday and there was interest in making a battery holder I talks about for fish detectors. I told the audience to look for instructions on PaddlePlanner.
Magic’s Ikea battery holder
The best battery holder I have tested is one of the least expensive and it is easy to build and weighs about 4.8 Oz.
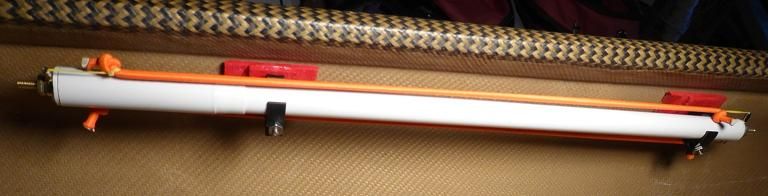
List of materials for battery holder from Ace HW or Ikea
Curtain rod Ikea 002.171.65 $0.99
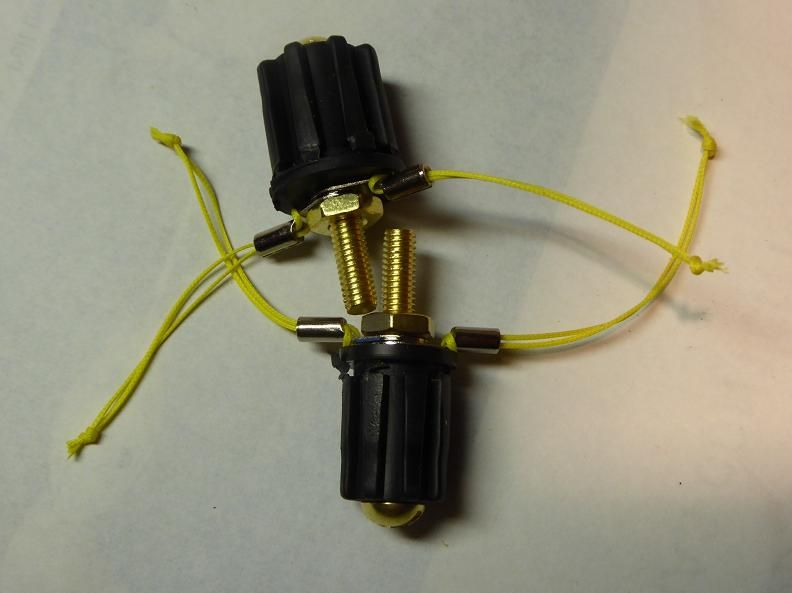
2 brass 10-32 X 1.5 screws + 4 nuts $2.00
4 Crimp ring terminals $0.25
4 7 inch pieces of braid fishing line 25LB $0.25
2 15 inch pieces 1/8” bungee cord $2.00
List of materials for mounting clips
2 6-32 X 1 &1/2 flat head screws with nuts $1.08
1 wooden yard stick $1.29
2 ½ inch pipe mounts ACE#556-2PK2 4033593 $0.50
4 drops of Amazing Goop $6.50/tube $0.50
Tools required:
Pliers
Fine tooth hacksaw (32 teeth/inch)
Screwdriver
Round file or sand paper
Two 2.5 inch pieces of duct tape
Electric drill
Drill bit between .130 and .150 diameter
Drill bit ¼ or larger
2 or 4 Small spring clamps or binder clips.
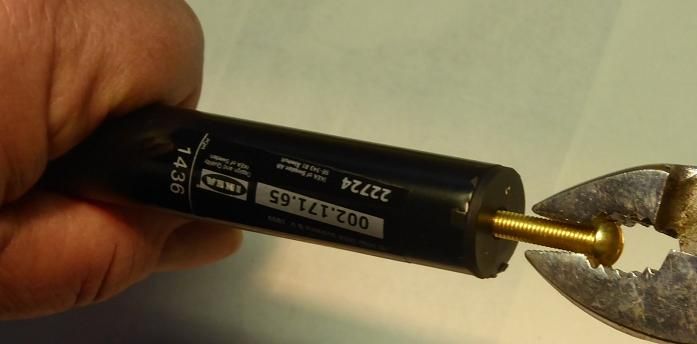
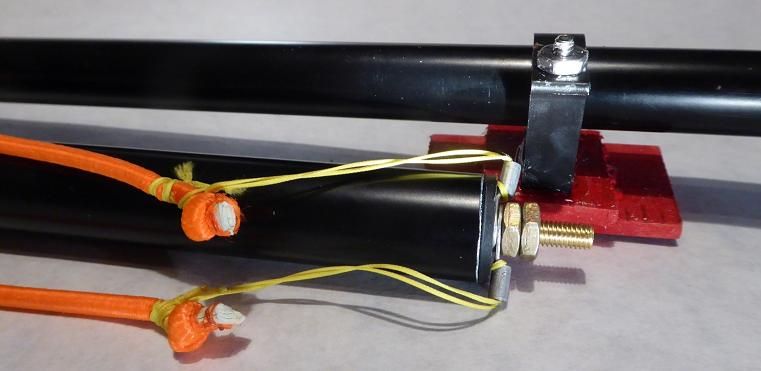
Screw the 10-32 screws into the ends of the curtain rod about ¾ inch. Pull the plastic end pieces out of the curtain rods. I had to hook my weak hand over my knee to pull out end piece.
Take the screws out of the plastic end pieces. Turn the plastic pieces around and put the screws back in. A screw driver will be required to get the screws all the way to the bottom. Put 2 crimp rings terminals on each 10-32 screw. Tighten one nut down with the crimp ring terminals facing away from each other. Add the second nut for safe keeping. Tie the ends of the 7 inch braid together making 4 endless loops. Thread the endless loop through the hole in the crimp ring terminal where the wire would normally go. Put the end of the endless loop through the other end of the endless loop like you were making a larks head
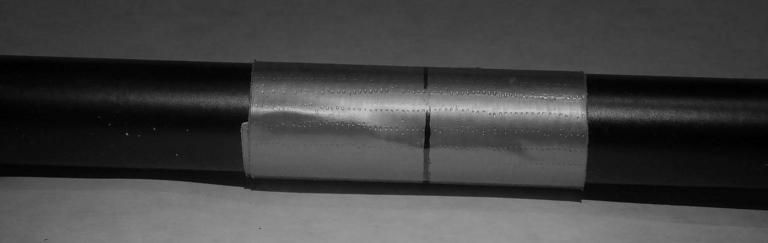
Next will be to cut the smaller diameter rod to length. For 8 Lithium batteries the tube should be cut to 16 &9/16 inches. For 10 alkaline batteries the tube should be cut to 20&1/2 inches.
Place a piece of duct tape around the tube approximately centered over the location where the tube will be cut. Measure and mark on the tape the location to cut the tube. Using a fine tooth saw cut the tube off at the line. (Note a tubing cutter will crimp the tube and not work properly) Using a file or sandpaper remove the sharp edges and burs on the cut surface.
Using the same procedure cut the large tube to 3&1/2 inches from the end of the plastic cone. Once the burs have been removed reinstall the plastic ends in the end of the tubes that was cut, covering any sharp edges. Some plastic ends fit fairly loose if they will come apart too easy put a ½ drop of goop on them to glue them into the pipe.
Tie a simple knot in both ends of the 15 inch bungee cords. If the ends of the bungee are passed near a flame it will stop them from fraying.
Use a Larks head to connect the ends of the bungee to the endless loops. If all is well if you put the correct number of batteries in in the tube just the end of the last battery will stick out.
Cut 2 one inch pieces off the yard stick. Cut 2 two inch pieces off the yard stick and using goop glue the 1 inch pieces in the middle of the 2 inch pieces. Use the binder clips to hold until the glue is set. Locate a spot ¼ inch from the edge and 1 inch from both end and drill a hole using the small drill bit (.130 to.150). By hand turning the large drill bit chamfer the hole on the end at the surface of the 2 inch piece. Test frequently to make the head of the flat head screw flush with the bottom of the wood. If you have any old outdoor paint use it to paint the wood.
Pull the nails out of the two ½ inch pipe mounts. Using the small (.130 to .150) drill bit enlarge the hole the nail was in. Before assembling place a small dab of Goop on the surface of the wood where the pipe mount will set. Assemble the 2 pipe mounts with the thin plastic away from the wood. The screw is being tightened against a soft wood and if over tightened will pull through the wood. The uncured Goop will leave a slick surface so properly align the pieces and let set until cured. Install mounting blocks by slipping over the end to reduce force on mounting blocks.

To mount in mounting clips in a canoe snap them onto a battery holder to keep them aligned. Tip the canoe so the mounting location is down and clean the spot where it will be mounted. Place a drop or two of goop or bathtub calk on the bottom of the 2 inch clip support and stick in place and let dry.
Edited by moderator Monday, March 16, 2015 12:48:34 PM(UTC)
| Reason: Not specified


